
If you are looking for an easy dried pineapple recipe that gives you sweet, chewy, and naturally delicious results, this guide is for you. With just a few simple ingredients and basic kitchen tools, you can turn fresh pineapple into a healthy snack that is perfect for everyday use. This dried pineapple recipe is ideal for beginners because the steps are clear, the process is simple, and the results are consistent. Whether you want a snack for work, a topping for breakfast bowls, or a homemade ingredient for baking, this dried pineapple recipe will help you make soft, flavorful dried pineapple right at home.
I. Ingredients for Dried Pineapple Recipe
Making this dried pineapple recipe requires just one main ingredient. That's right, you only need fresh pineapple to create this delicious snack. No complicated shopping list or fancy additions required.
Main Ingredient:
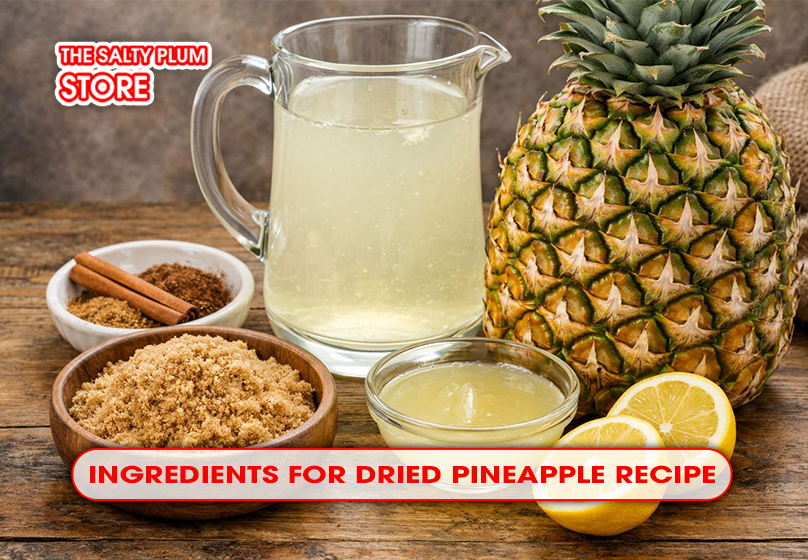
- Fresh pineapple (1 large whole pineapple, about 3 to 4 pounds)
- Lemon juice (1/4 cup lemon juice mixed with 4 cups water) - This helps prevent slight browning if you want your dried pineapple to stay bright yellow. Most people skip this step since any discoloration doesn't affect taste or quality.
- Cinnamon or spices - A light dusting before drying adds extra flavor depth.
- Brown sugar (optional) - Some people sprinkle a thin layer halfway through drying for extra sweetness and shine, though pineapple is naturally sweet enough.
Choosing the Right Pineapple:
For the best dried pineapple recipe results, select a ripe pineapple with these characteristics:
- Golden yellow skin (more yellow than green)
- Sweet, tropical smell at the bottom
- Gives a little when you press it lightly with your fingers
- Fresh green leaves on top (a little browning is okay)
- Heavy for its size
Avoid pineapples that smell fermented, have very brown leaves, or feel mushy. Remember, pineapples don't ripen after picking, so choose one that's already ripe.
Read more: Simple Dried Mango and Pineapple Recipe for a Sweet Tropical Snack
II. Tools You Can Use
The beauty of this dried pineapple recipe is that you don't need expensive or specialized equipment. Chances are you own most of this equipment already.. Here's what you'll need to make perfect dried pineapple at home.
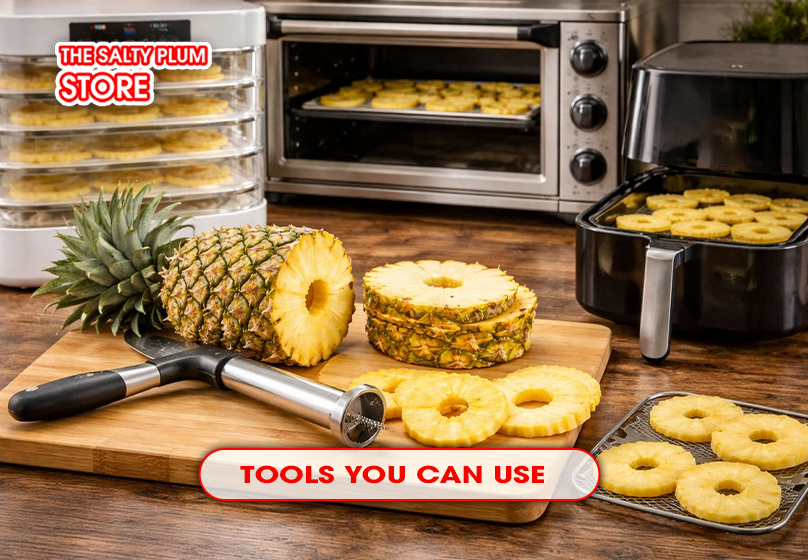
Essential Tools:
- Sharp knife: A good-quality chef's knife makes cutting pineapple easier and safer. Sharp blades glide through the tough skin and fibrous core smoothly.
- Cutting board: Use a large, sturdy cutting board that won't slip. Pineapple can be slippery, so stability matters.
- Pineapple corer (optional but helpful): This handheld tool removes the core and cuts the pineapple into rings in one motion. It saves time, but a regular knife works just fine if you don't have one.
Drying Equipment Options:
You can make this dried pineapple recipe using any of these three methods. Choose based on what equipment you already own
- Option 1: Food Dehydrator (Best Results)
A food dehydrator gives you the most consistent results. The even airflow and temperature control make drying foolproof. - Option 2: Oven (Most Convenient)
If you don't have a dehydrator, your regular oven works great. This is the most accessible method since everyone has an oven. - Option 3: Air Fryer (Fastest Approach)
Air fryers work surprisingly well for small batches of this dried pineapple recipe. Perfect if you want to test the recipe before making larger quantities.
III. How to Make Dried Pineapple Recipe Step by Step
Making this dried pineapple recipe is straightforward once you understand the basic steps. Follow this guide carefully for the best results, whether you're using a dehydrator, oven, or air fryer.
Step 1: Prepare Your Pineapple
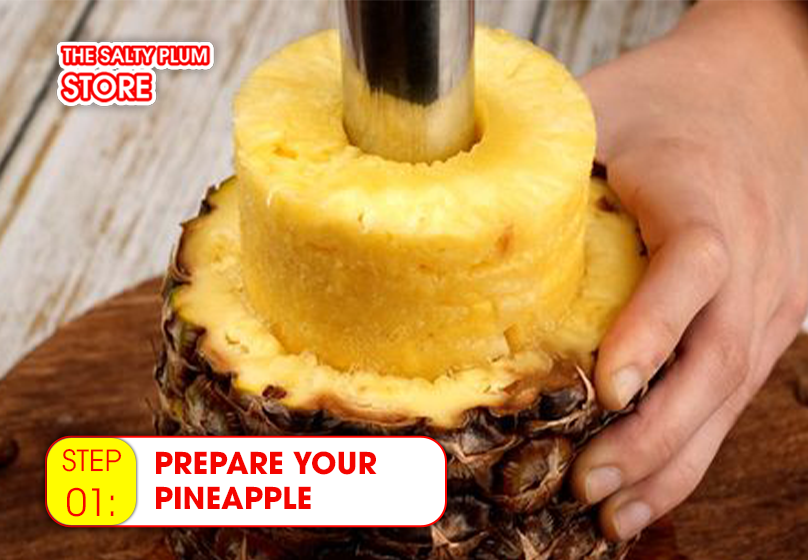
Start by choosing a ripe pineapple with golden yellow skin and a sweet smell at the base. Here's how to prepare it properly:
- Set the pineapple on a solid cutting surface. Using a sharp knife, cut off the top (crown) and bottom of the pineapple about 1 inch down. This creates flat surfaces so the pineapple stands upright safely.
- Position the pineapple upright on the cut bottom. Carefully slice down the sides from top to bottom, removing the skin in strips. Continue cutting around the whole pineapple. Don't worry about being perfect at first, you can go back and remove any brown "eyes" (the small brown spots) that remain.
- Once peeled, remove the tough core. The easiest method is to cut the pineapple into quarters lengthwise, then slice away the hard center core from each quarter. Alternatively, you can use a pineapple coring tool to remove the core in one motion if you prefer ring shapes.
Step 2: Slice the Pineapple
This is the most important step for this dried pineapple recipe. Consistent slice thickness helps everything dry at the same rate. Cut your prepared pineapple into slices that are 1/4 inch thick (about 6mm). Pick from these shape options:
- Rings - Cut across the whole pineapple after coring for classic round shapes (these take 14 to 18 hours to dry)
- Chunks - Cut into bite-sized pieces about 1 to 1.5 inches long (these take 10 to 14 hours to dry)
- Wedges - Cut rings in half or quarters for medium-sized pieces (these take 12 to 16 hours to dry)
Pro tip: Thinner slices dry faster and become crispier, while thicker slices stay chewier. For this dried pineapple recipe, 1/4 inch thickness gives you the perfect chewy texture.
Step 3: Optional Pre-Treatment
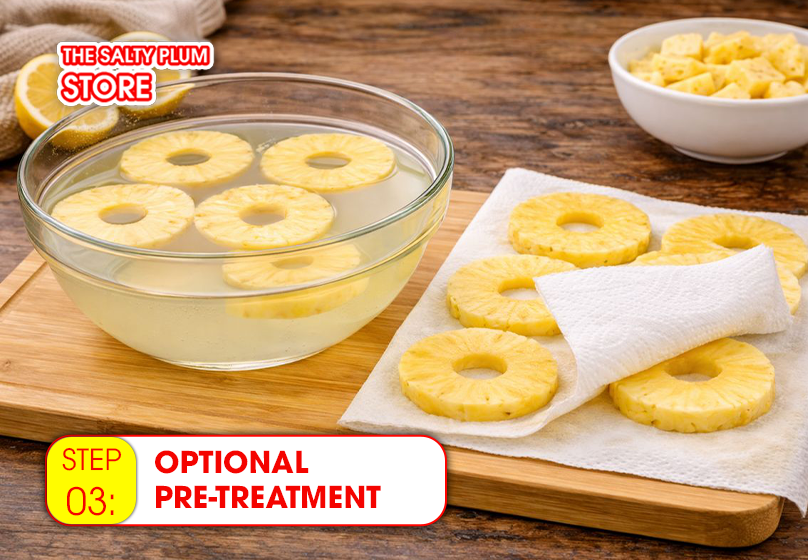
This step is optional for the dried pineapple recipe. Some people like to prevent slight browning by soaking pineapple in a lemon water solution.
Mix 1/4 cup lemon juice with 4 cups water. Dip your pineapple slices in this mixture for 30 seconds, then drain well on paper towels. Pat the slices dry before placing them in your dehydrator or oven.
Step 4: Arrange on Trays
Place your pineapple slices in a single layer on dehydrator trays, baking sheets, or air fryer baskets. Make sure pieces don't touch or overlap. Air needs to circulate around each slice for even drying. If using an oven, line baking sheets with parchment paper or silicone mats to prevent sticking.
Step 5: Start the Drying Process
The drying method depends on your equipment. Here's how to execute this dried pineapple recipe with each option:
For Dehydrator:
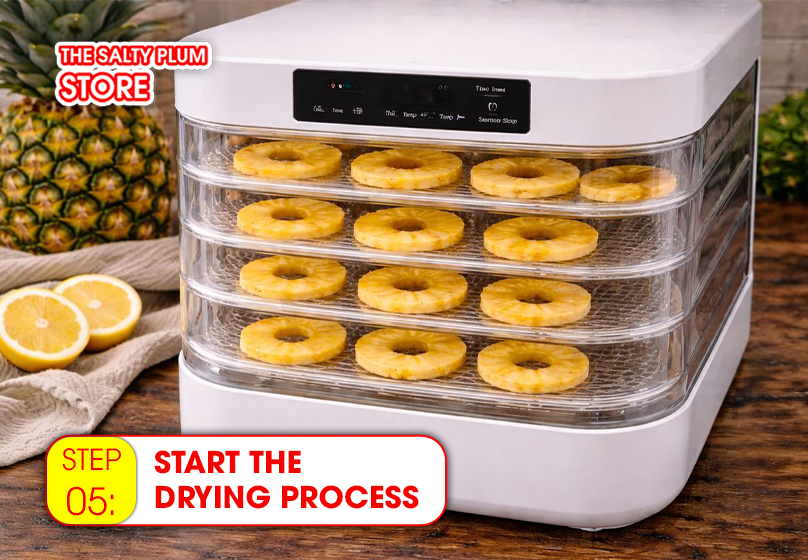
- Adjust your temperature dial to 135°F (57°C)
- Arrange trays in the dehydrator
- Dry for 12 to 18 hours
- Check progress after 10 hours, then every 2 hours
- Switch tray positions at the midpoint to promote uniform results
For Oven:
- Preheat oven to the lowest setting (ideally 200°F or 95°C)
- Position your baking trays on the center oven racks
- Prop oven door open about 2 inches with a wooden spoon to let moisture escape
- Dry for 3 to 6 hours
- Flip pineapple slices every hour for even drying
- Check progress after 3 hours, then every 30 minutes
For Air Fryer:
- Set to dehydrate function or lowest temperature (135°F to 175°F)
- Arrange slices in basket without overlapping
- Dry for 4 to 8 hours
- Check and flip every 2 hours
- Work in batches since air fryers hold fewer slices
Step 6: Test for Doneness
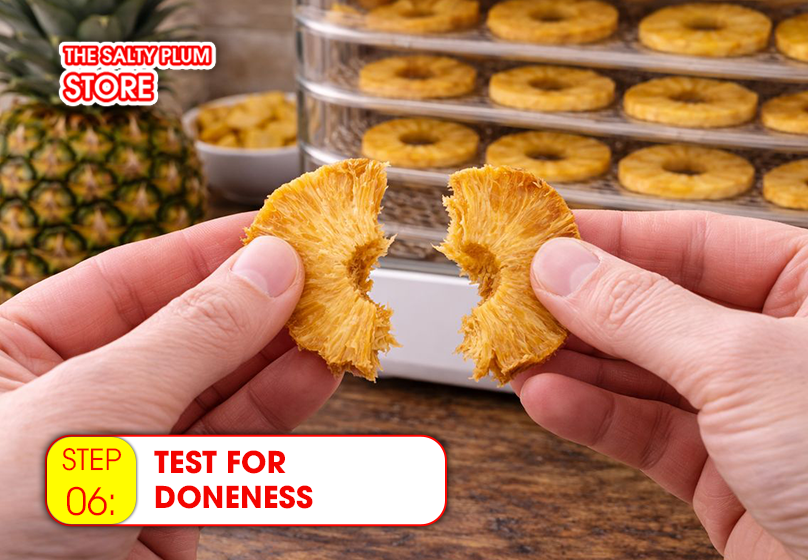
Knowing when your dried pineapple recipe is complete takes practice. Here's how to test properly:
Remove one piece from the dehydrator, oven, or air fryer. Let it cool completely for 5 minutes (hot pineapple feels different than cooled pineapple).
Well-dried pineapple will have these qualities:
- Feels dry when touched (no wetness or stickiness)
- Leathery and pliable (bends without breaking)
- Has a chewy texture when eaten
- Shows no moisture when you tear it and squeeze
If moisture beads appear when you squeeze a torn piece, return all slices to continue drying for another 1 to 2 hours.
Step 7: Cool Completely
Once your dried pineapple recipe reaches the right texture, turn off your equipment. Let the pineapple slices cool to room temperature while still on the trays. This usually takes 30 minutes to 1 hour.
Never store warm dried pineapple. The residual heat creates condensation inside storage containers, which leads to mold.
Step 8: Condition Your Dried Pineapple (Recommended)
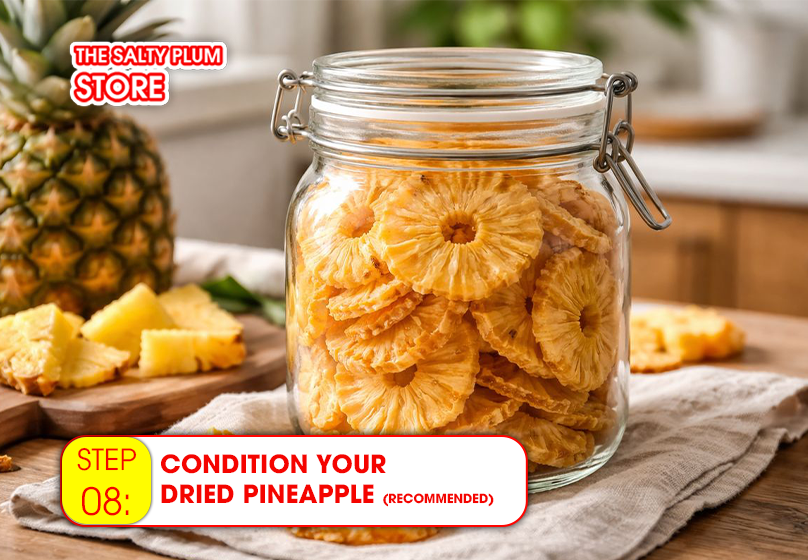
- Conditioning is an optional but smart step for this dried pineapple recipe. It redistributes any remaining moisture evenly among all pieces.
- Place cooled dried pineapple loosely in a clean glass jar. Don't pack it tightly. Seal the jar and leave it on your counter for 7 to 10 days. Shake the jar once daily to keep pieces from sticking together.
- Check the jar every day for condensation on the glass. If you see moisture droplets, your dried pineapple needs more drying time. Return it to the dehydrator or oven for another 1 to 2 hours. Throw away all the dried pineapple if mold appears anywhere.
- After 7 to 10 days with no condensation, your dried pineapple recipe is perfectly dried and ready for long-term storage.
IV. Conclusion
This dried pineapple recipe is a simple and reliable way to make sweet, chewy, and naturally delicious dried fruit at home. With the right slices, gentle drying, and a little patience, you can enjoy a healthy snack without added preservatives or artificial sugar. Homemade dried pineapple is perfect for daily snacking, adding to cereal, yogurt, baking, or taking with you for a quick energy boost.
If you do not have time to make it yourself, or you want to enjoy high-quality dried pineapple with consistent texture and flavor, you can also buy dried pineapple at The Salty Plum Store. It is a convenient option for those who love natural dried fruits and want to experience the same sweet and chewy taste without the preparation time.
Related Article: